
Auto Reframe Vs Manual Keyframe Tracking 9:16 Vertical Premiere Pro
Auto Reframe versus manual keyframes for 9:16 Premiere Pro: hook windows, 250 px safe zones, and QC that keeps faces inside the vertical crop.
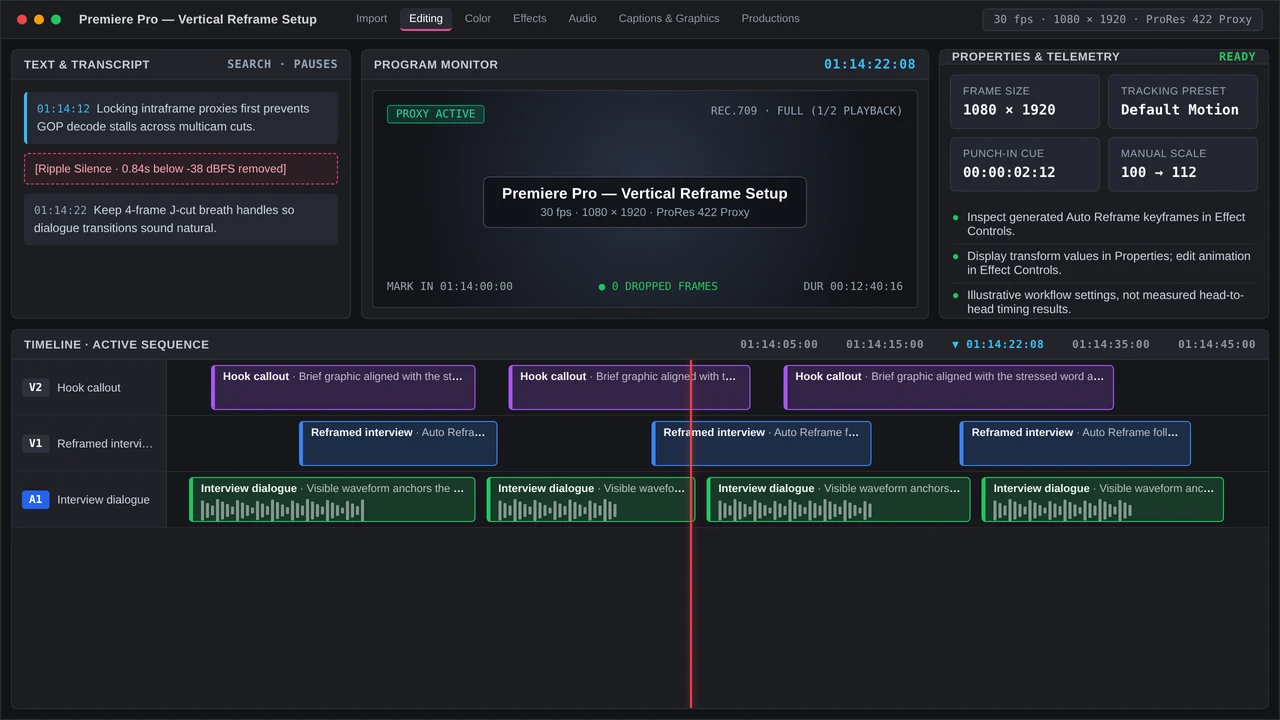
Auto Reframe asks Premiere to keep a face framed inside your 1080x1920 crop. With manual keyframes, you place the Anchor Point yourself and drive Position plus Scale against the delivery. You’ll feel that control when a viewer’s thumb hangs over the screen and the punch-in has to hit the exact stressed word carrying your hook.
What Are the Verified Benchmarks for Auto Reframe vs Manual Keyframe Tracking 9:16 Vertical Premiere Pro?
No clean, published head-to-head timing benchmark exists yet. Judge each workflow by what your cut demands: the delay before the first visual change, the spacing between later changes, and the caption clearance needed around platform UI.
Put a visual pattern interrupt or punch-in into a short-form vertical video during its first 3 seconds, and it can retain up to 65% of viewers beyond the opening swipe window [TikTok Creative Center Hook Study, 2025]. Across high-retention talking-head edits for Instagram Reels and YouTube Shorts, the picture changes every 2.5 to 4.0 seconds on average through a zoom cut, B-roll insert, or graphic callout [Wistia State of Video Report, 2025]. For 61% of video marketers, short-form vertical clips under 60 seconds deliver the highest ROI of any format across organic and paid social channels [Wyzowl Video Marketing Statistics, 2026].
The follow may glide along with the eyes and still leave your opening visually flat. Jumping Scale deliberately puts a sharper beat on the stressed syllable. Build those punch-ins into the same rhythm as your B-roll and callouts so any tracking drift has a groove to live inside.
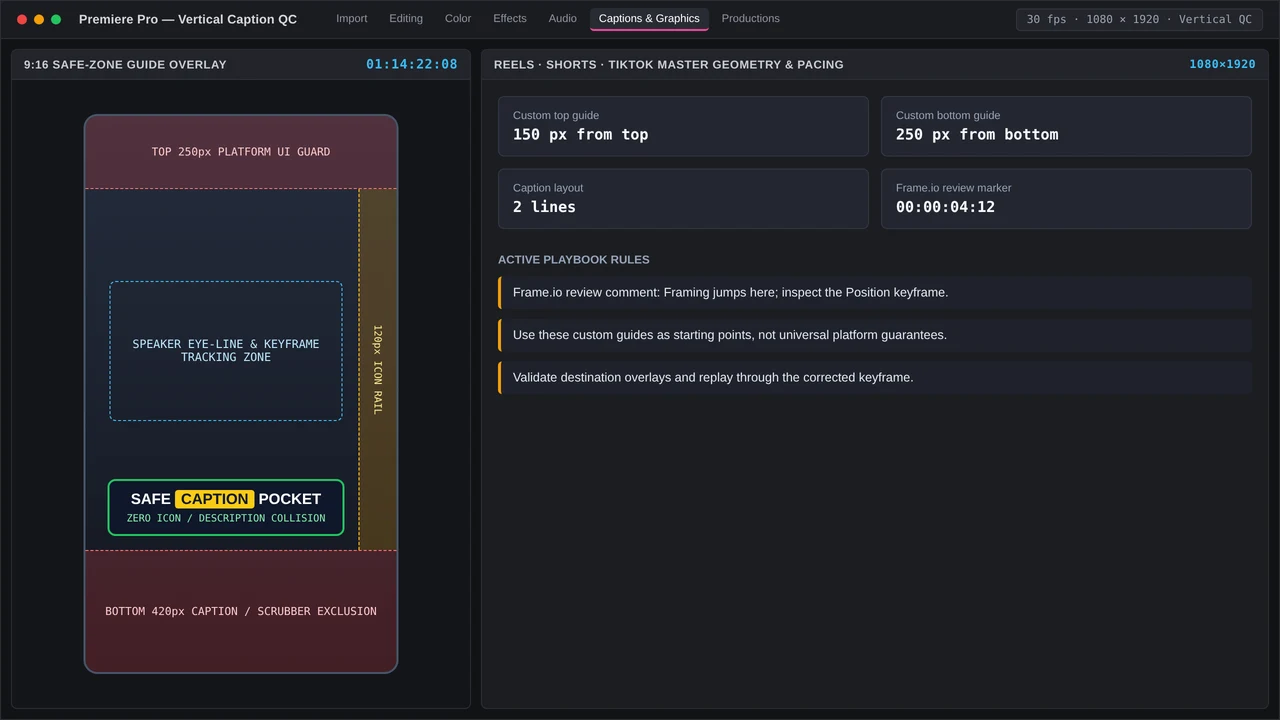
Watching a mobile social feed on mute is common in public or workplace settings, reaching up to 75% of viewers [Verizon Media & Publicis Mobile Viewing Study, 2024]. That audience needs readable space below the face. For 1080x1920 exports headed to Reels, Shorts, and TikTok, leave at least 250 px between burned-in captions and the bottom edge, and keep them 150 px or farther below the top, so UI chrome won’t overlap them [Meta & YouTube Vertical Safe-Zone Guidelines, 2025]. For adult English subtitles, Netflix allows 42 characters per line and a maximum of 20 characters per second [Netflix Partner Help Center Timed Text Guide, 2025]. Treat both ceilings as reading checks when trimming captions in the Text panel.
| Decision point | Auto Reframe | Manual keyframe tracking |
|---|---|---|
| Subject behavior | One slow presenter | Walks, two-shots, graphics |
| First 3 seconds | Follows the body | You land the zoom-cut |
| Cut cadence | Continuous drift | Each key group is a beat |
| Caption margin | Repair after analysis | Frame the 250 px margin |
| Batch assembly | Sequence command, then repair | Slower, then repeatable |
| Typical break | Wrong face or sliced graphic | Uneven easing if rushed |
Does Auto Reframe Count as a Pattern Interrupt in the First 3 Seconds?
Check that opening at phone size, because a gentle follow may read as the same old shot. Batches of clips under 60 seconds featuring one slow-moving presenter suit Auto Reframe well. If its path makes the opening beat feel too quiet, put a manual Scale change right on the hook.
Step-by-Step Premiere Pro and DaVinci Resolve Setup for Auto Reframe vs Manual Keyframe Tracking 9:16 Vertical Premiere Pro
Before reframing, pull only the usable selects out of your long-form timeline. Analysis and cleanup then stay focused on footage you’ll actually ship.
Premiere Pro Auto Reframe Sequence and Manual Keyframe Setup
In the source sequence, select Sequence > Auto Reframe Sequence, with Vertical 9:16 as the target. Preserve the master frame rate, then verify 1080x1920 on the resulting sequence. Match the movement with Default, Slower Motion, or Faster Motion and start the analysis.
Effect Controls is where you’ll review the follow path. If a face gets too close to an edge, reframe it and inspect Position there or in the contextual Properties panel. Manual tracking starts with the Anchor Point near the eyes; keyframe Scale and Position from there so your punch-in catches the hook and the face remains above the caption band.
Build captions in the Text panel, then use Properties for styling that matches your Graphics Templates look. Their placement needs at least 250 px of clearance above the bottom and 150 px below the top; keep reading speed near 20 characters per second and line length within 42 characters per line. A $100 one-time Excalibur license can center the anchor and fire a keyframe macro for you, though the zoom’s landing spot remains your call. With an annual commitment, Premiere Pro’s single-app plan runs $23 a month.
DaVinci Resolve Transform, Dynamic Zoom, and IntelliTrack Setup
Start Resolve with a 1080x1920 timeline. In the Inspector, increase Transform Zoom until your wide image fills that vertical frame, and keyframe Position around the delivery. A single push toward the face can come from Dynamic Zoom; you won’t find a Resolve command called Auto Reframe Sequence.
Walking subjects get assisted tracking from Resolve Studio’s IntelliTrack. A perpetual Studio license costs $295. Use the Color page or a Fusion Tracker node for the track, then shift the framing to hold the eyes above your captions while preserving 250 px of clearance at the bottom caption margin.
Common Timeline Bottlenecks and QC Checks When Handling Auto Reframe vs Manual Keyframe Tracking 9:16 Vertical Premiere Pro
Leave room in the schedule for repairs once analysis finishes. If Auto Reframe runs only on delivery selects, you won’t waste time cleaning pauses that the edit will remove anyway.
Two-shots need close attention since the follow may jump to the wrong face halfway through a sentence. Use manual Position keys to stay on the speaker, then move over to the listener if the reaction earns a cut. Wide lower thirds need rebuilding for vertical; a nameplate can otherwise collide with the right-rail action icons. After the follow looks right, remove crowded keys wherever they make its path twitch.
Safe-Zone Caption and Playback QC on the Vertical Timeline
At phone size, play those first 3 seconds and decide whether enough visual change registers mid-swipe. Captions should clear the mouth, remain at least 250 px off the bottom, and sit 150 px below the top. Do a read-through near 20 characters per second, keeping every line to 42 characters or fewer.
Check every punch-in by scrubbing for soft faces and clipped hairlines. Filling a 1920-pixel-tall frame already enlarges a 1080-pixel-tall source, so inspect any extra push closely. For client review through Frame.io, the Pro plan is $15 per user each month, and comments can become markers right on the offending keyframe.
Let Auto Reframe make the first pass when one slow-moving presenter carries the shot. Go manual if the hook needs a punch-in inside 3 seconds, if two people share the frame, or if the follow starts crowding the caption band. Park the playhead on every zoom cut before export and inspect the eyes, mouth, and caption clearance.
More in Razor & Reel
Verified benchmarks for picking podcast moments that hold 65% of viewers past the first 3 seconds, plus Premiere and Resolve vertical shorts QC setup.